Digital Voice Hotspot on Windows for about $40
You can buy a pre-built, ready to go, MMDVM hotspot relatively inexpensively – around $40 – from a variety of vendors. Most them come with a 3D printed case, so why would you want to build one?
Because we can.
Early days of the hobby, almost everything was built. Commercial hardware for amateur radio wasn’t really a thing, and what you could buy usually needed some modification to work on the right bands. Since much of this equipment was tube-based, you also spent time repairing, adjusting drift, aligning, and general fiddling. That was part of the attraction for many to the hobby. In this century, the century of convenience and have-to-have-right-now, you can buy just about anything you want. Add to cart, check out, and FedEx\UPS\Bezobub (Amazon) will drop it right at your door – sometimes within hours of checking out. Gone are the days of waiting 6-8 weeks for your COD package to arrive (and hope you are home when it does since you have no clue when that would be). Opening up a box full of parts, dragging out the soldering iron from behind the mayonnaise jar of random screws and hinges, and putting together hardware under a 40w incandescent drop light in a musty basement are distant memories. Now our basements are game rooms, the lights smart LEDs, and the hardware just needs to be plugged in. So, let’s go old school with new technology and build a digital voice hotspot. Just for giggles, let’s also run it on Windows. Yeh, I know, real tech people use Linux. I use Linux, but sometimes Linux pisses me off, especially when it comes to WiFi and bluetooth hardware. Since the computer I wanted to connect this to has a Realtek WiFi adapter – hit or miss with Linux – and not everyone can play in Linus’s toy box, we are going with Windows 11. Additionally, while I could set this up on R Pi, I’m really trying to scale back on the number of single-purpose devices I have scattered about our house. The laptop I’ve set this up on is my general purpose radio hobby laptop. It runs all the time anyway, it is logical. Plus I’m running out of electrical outlets… As a bonus, this is pretty easy to do. The reward to effort ratio is quite favorable.
Before I get into the fun stuff, I would be remiss if I assumed everyone knows DMR, what is a hotspot, and why we would want one. DMR is a digital voice mode. It has upsides and downsides compared to analog voice, the default communication mode for 2m\70cm repeaters. Let’s start with the down, we can only go up from there. This is not an inclusive list.
Downsides:
– Radios are typically more expensive than comparable analog-only rigs.
– Programming is a different animal than analog and requires a mind-shift.
– You need to learn a different vocabulary.
– Most DMR CPS (Computer Programming Software) are craptastic at best. Even the popular OpenGD77 is not nearly as easy as Chirp.
– Digital is much more sensitive to the Signal to Noise Ratio (SNR), to the tune of 10-12db vs 6-8db for analog.
– Digital doesn’t degrade signal gracefully. It cuts and clips out, where analog can pull in a weak signal if you listen hard enough.
– Analog can do FM, AM, and SSB. Digital is FM-only.
– DMR transmissions can sound robotic and flat.
– Need to “kerchunk” or open repeater to listen.
So why would we want to do DMR?
– Radios can do analog and digital.
– Digital signal is cleaner and clearer until it drops.
– Uses significantly less bandwidth than analog.
– Allows two discrete conversations per channel vs one with analog.
– Potentially longer battery life.
– SMS messaging possible without intermediary system.
– Internet linking and linked repeaters allows you to talk around the world on an $80 Baofeng.
– Hundreds of talkgroups available, is like having 100s of nets available at any time.
– You can test your configuration, RX\TX quality without needing another user. DMR has a “Parrot” talkgroup (TG990 or 310997). You TX to it, it records and plays it back to you.
Ok, so why a hotspot? Can’t I just use a repeater?
You can as long as you have one that supports DMR, allows its use on DMR when you want to use it, and it is on the network you want to use. I have two repeaters within analog HT range of my couch that support DMR. One I cannot hit with digital consistently. The other one I can, but it only allows DMR a couple hours on weeknights and not at all on weekends. Not all repeaters support all networks. With a hotspot you can be on TGIF or Brandmeister or Fusion regardless of local availability.
Let’s get started.
Unlike analog, you need a separate ID (not your callsign but is linked to your callsign) in order to use DMR networks. Fortunately, you only need to register one ID use the multiple DMR networks available. Brandmeister, DMR-DMARC, TGIF, and others all recognize DMR IDs from the same source: Radio ID. Head on over to the link, register, and record your ID number. You don’t need to remember it like you do a callsign, this won’t be transmitted by voice during a call. You will need to enter it into your radio, and once up and running, your hotspot configuration to allow you on networks. Keep this number in an easy-to-find place.
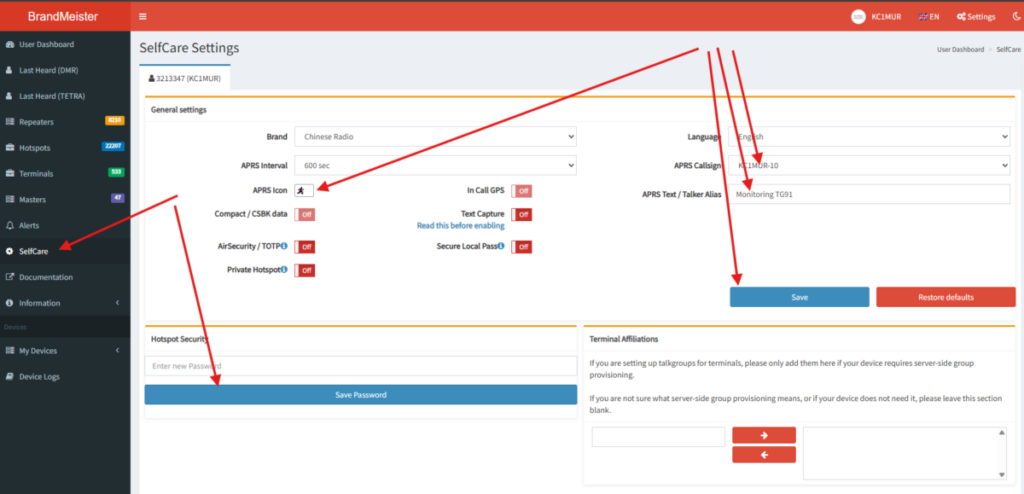
Once you have your ID, head over to Brandmeister and TGIF and make accounts. Completed your registration, log back in and head over to the “Self Care” sections under your Account profile so you can register your hotspot. You don’t need to do this before you build your hotspot, you can wait. I like to do it now while I’m thinking of it instead of later when I can’t figure out whynothing is working. Create a hotspot password, enable and configure APRS over DMR if you want while in there. Save.
You will need to program your radio with a codeplug. This is beyond the scope of this article, there’s too many different radios and CPS to cover this here. I recommend hitting a reputable YouTuber or blogger using your radio model as a keyword. I have a Baofeng DM-1701 and DM32 Pro. They use different CPS and firmware, even export\import from one to another isn’t always a smooth process. If you can, find a compatible codeplug (basically a complete radio export) for your radio and where you want to operate. People share them on forums, social media, etc. This saves significant time and headache. Before you upload to your radio, make sure you have entered iwhere required (usually in the general settings) the Radio ID number you registered, else you are going to be really frustrated when nothing works.
Now we get to go shopping.
We will need two components beyond our PC to build the hotspot:
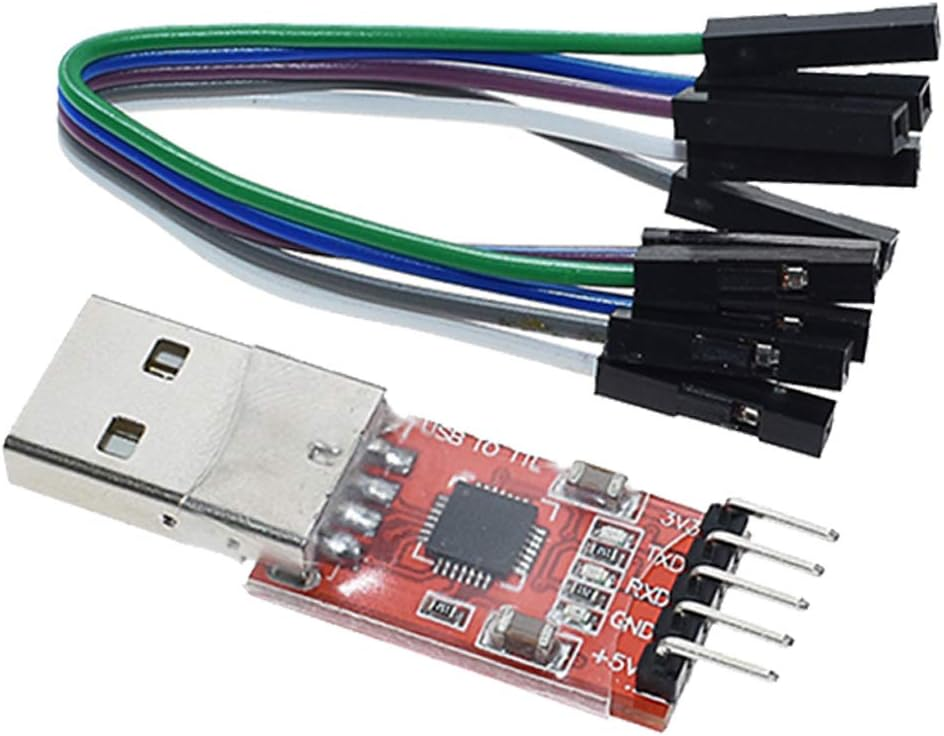
– USB TTL to Serial converter, something that says it is “CP2102 USB 2.0 to TTL Module Serial Converter Adapter Module USB to TTL”. Do not worry if it says R Pi someplace or says it only works with R Pi. This is misleading and inaccurate. Just get one with that chipset from a vendor you are comfortable using. Cost should be under $10 even with current tariffs.
– MMDVM Hat (usually comes with a stubby antenna, for home use that will be fine). This also may say R Pi or only works for R Pi. As long as it has 4 spots to connect the TTL to Serial to the MMDVM board that are labeled: 5V, TX, RX, GND, you can make it work. 3.3V is not used. Cost is typically under $30.
TTL to Serial
HAT:

Put both in your cart, check out, and wait for it to show up. Once here, we have to assemble it. While not hard to do, depending on the devices you get, there is some trial and error involved.
Make life easy on yourself and refrain from attaching the antenna until the end. It makes it easier to deal with attaching the wires if you don’t have the damn thing sitting at an angle.
Step 1 – connect wires to the TTL to Serial Converter pins. Hopefully yours came with colored jumpers. If not, pick up a set with connectors that match your needs (M-M or M-F) based off the socket\pin configuration of the two devices. In my case, the jumpers I got were F-F but I had male on the TTL and female on the Hat. No joy. A quick trip to my box of Arduino crap solved this. I do not recommend soldering the wires until you have a working unit.
Step 2 – This is where it can get a bit sketch. I’ve seen the wire mapping done both way on what appear to be identical components. You might have to try both combinations to find the right mapping for the RX & TX connection. DO NOT REVERSE THE 5V and GND! That is volts in and ground. Reversing releases the magic smoke and devices get cooked. Not good. Connect the 5V wire on the TTL to the 5V pin\socket on the MMDVM. Connect the GND on the TTL to the GND on the MMDVM. Connect RX on the TTL to TX on the MMDVM. Connect TX on the TTL to RX on the MMDVM. Plug the TTL into your PC USB 2.0 or higher socket. If there are two lights lit on the MMDVM, one of them flashing\blinking, you are golden. If not – either only one lit or both solid light – you have to use the alternate mapping. Connect TX to TX and RX to RX between the TTL and MMDVM (disconnect from USB before moving wires) and try again.
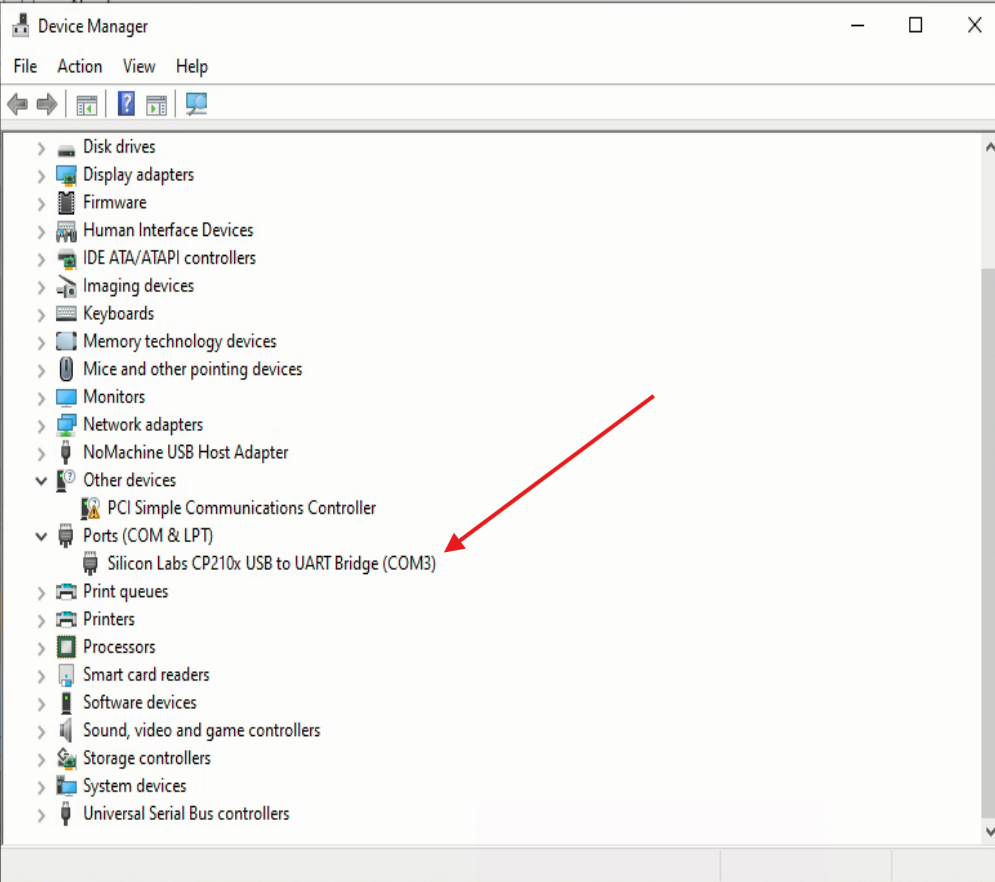
Step 3 – Go into Windows Device Mangler (Manager) and confirm it has registered the COM port correctly as a USB to UART Bridge . Remember the COM port number, you’ll need it when we get to the software. If the device is missing and you have an “unknown USB” under other devices, you need to get the updated drivers for the chipset on the TTL. Download the official VPC drivers from Silicon Labs here, unzip, and install them for the “unknown USB” using the update driver dialog. Reboot the PC to ensure stability of the device and driver.
Step 4 – Go over to PA7LIM’s site and grab BlueDV for Windows. The download link isn’t obvious, see the image below for help. Download and install.

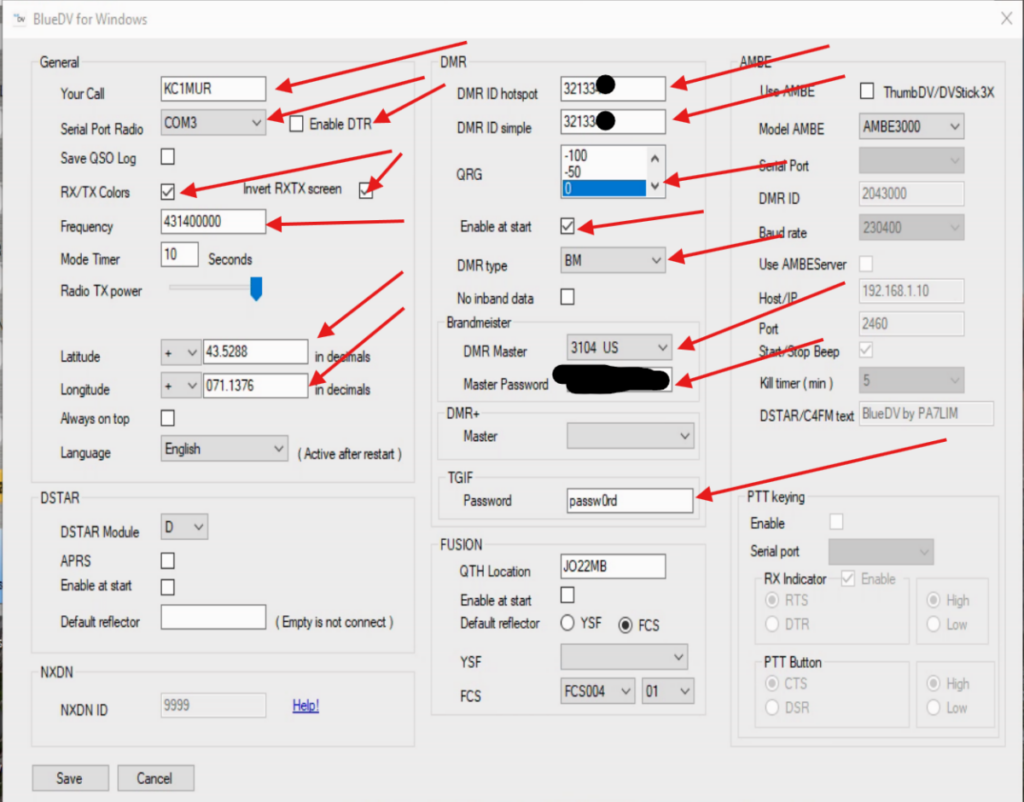
Step 5 – Run BlueDV. Once the main window loads, go to Menu >Setup.This looks a bit confusing because BlueDV has a lot of functionality, including working with Fusion, DSTAR, and NXDN besides DMR. It really isn’t bad once you understand the layout.
We are only going to cover DMR here.
1 Put in your CALLSIGN
2 Select the COM Port for your TTL device.
3 Make sure DTR is UNCHECKED
4 Make sure RX/TX Colors and Invert RXTX screen are checked.
5 Check with your local bandplan on acceptable frequencies for hotspots. For the Northeast USA, I’m using 43140000 (note, do not put in the decimal). The hotspot is simplex.
6 Enter in your lat\long
Move to middle section
7 Enter in your DMR ID in both fields. Typically they will be the same number unless you are operating more than one hotspot. For this tutorial we will assume you are using just this one.
8 Make sure QRG is set to 0 initially. This is to calibrate to the radio frequency, this is rare with this setup.
9 Check Enable as start if you want the hotspot to automatically connect at launch.
10 Chose your network. Only one network can be active at a time, unfortunately. For this one we will look at Brandmeister (BM). I don’t use Fusion and TGIF is dead-nuts simple, select TGIF from the dropdown and you are done. The default password is already set.
11 Set your DMR Master for your region. I find that 3104 is the most consistent for Northeast USA.
12 Set your password for Brandmeister, the one you setup in Self Care for Hotspot password.
13 Save.
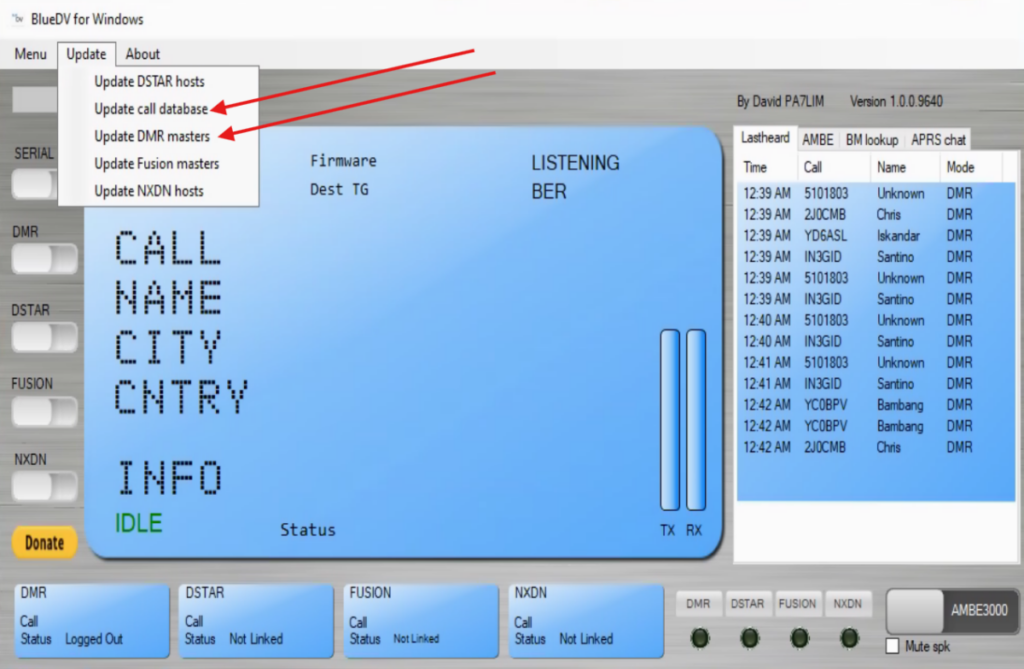
14 Before we fire it up, a little maintenance should be done. I try to do this weekly. At the top of the main BlueDV window select the Update menu. At minimum select the two indicated. Update other options as needed for networks you use. Close all dialog boxes when completed.
15 The call database update will import Name, Callsign, Country, City, and DMR ID for contacts you hear when on DMR. This information will appear on your radio and on the BlueDV interface. If no record is found or if you haven’t updated after the user registered, only DMR ID will appear. Since new users are added daily, do this update frequently.
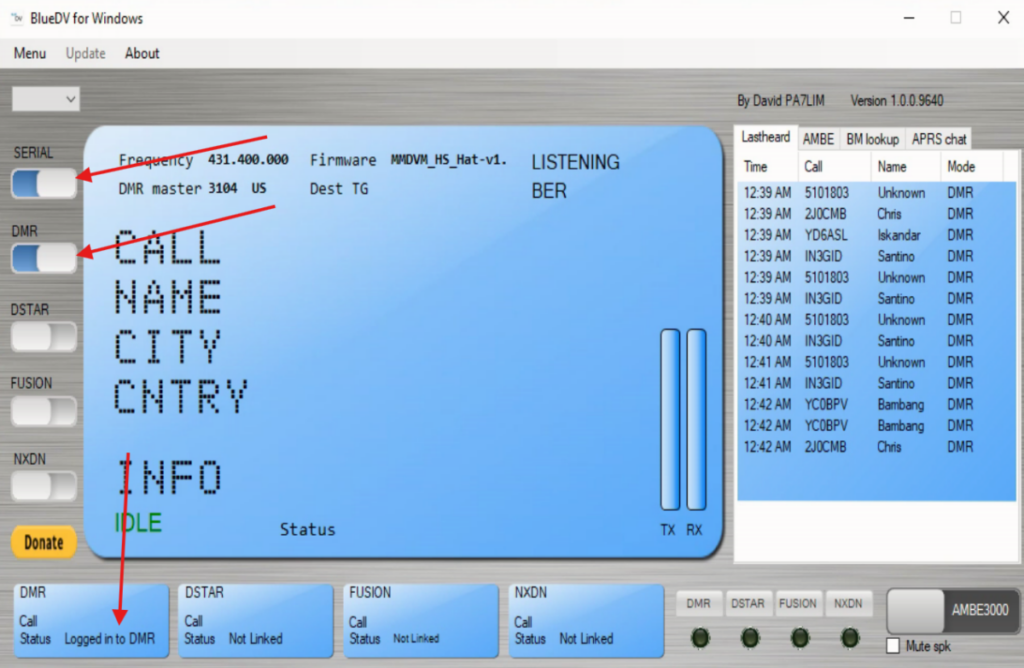
15 Slide the Serial toggle to the right. This will – hopefully – fire off the hotspot. If the COM is correct and the TTL to MMDVM TX\RX connection is valid (COM error will say on the screen Unable to Open COM PORT), the DMR (or DSTAR, FUSION, NXDN) toggle should automatically shift to the right after a second or two without user intervention. The appropriate blue box at the bottom should show connected to the network.
We are almost ready to rock. Grab your radio and select the zone and channel you setup for your hotspot. Typically we will use TS 2, Color Code 1 as shown below (example is using OpenGD77, your CPS might appear differently).
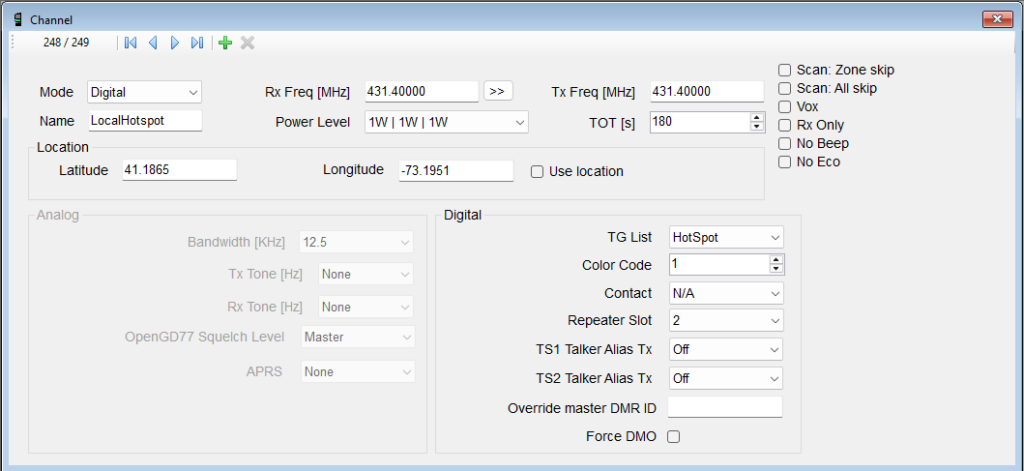
Using a hotspot is exactly like using a DMV repeater. You must “kerchunk” the channel by briefly pushing the radio PPT. This tells the server that you want to listen and the radio to listen.
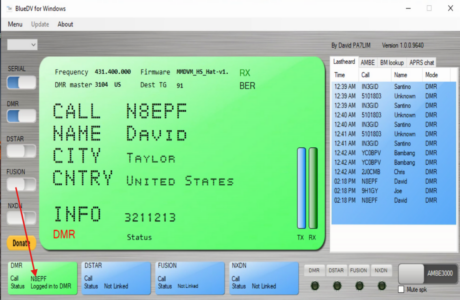
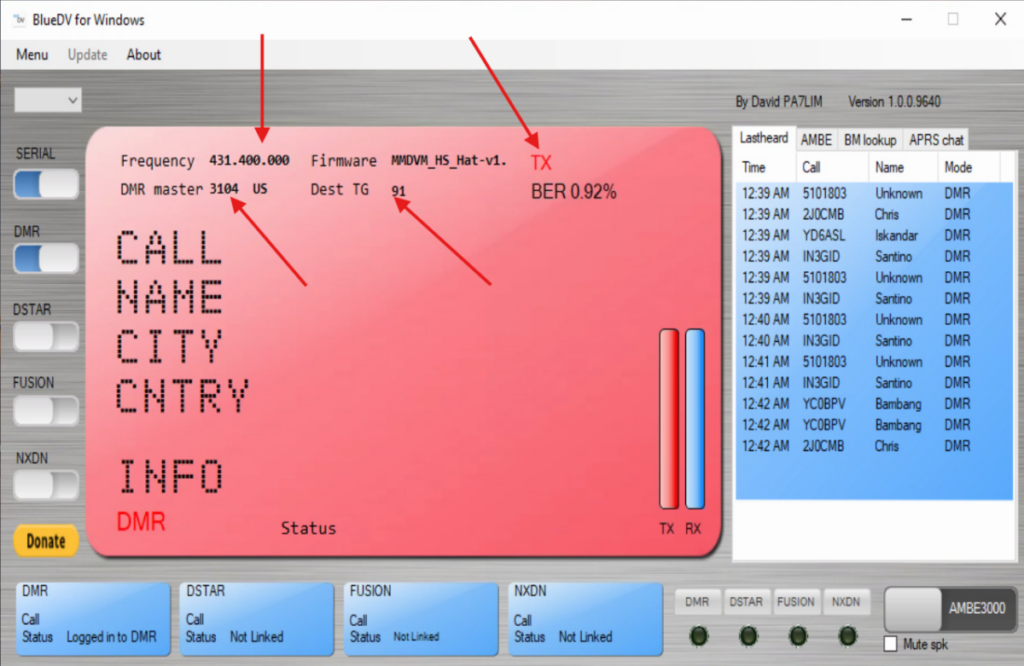
TX connection should make the BlueDV screen RED
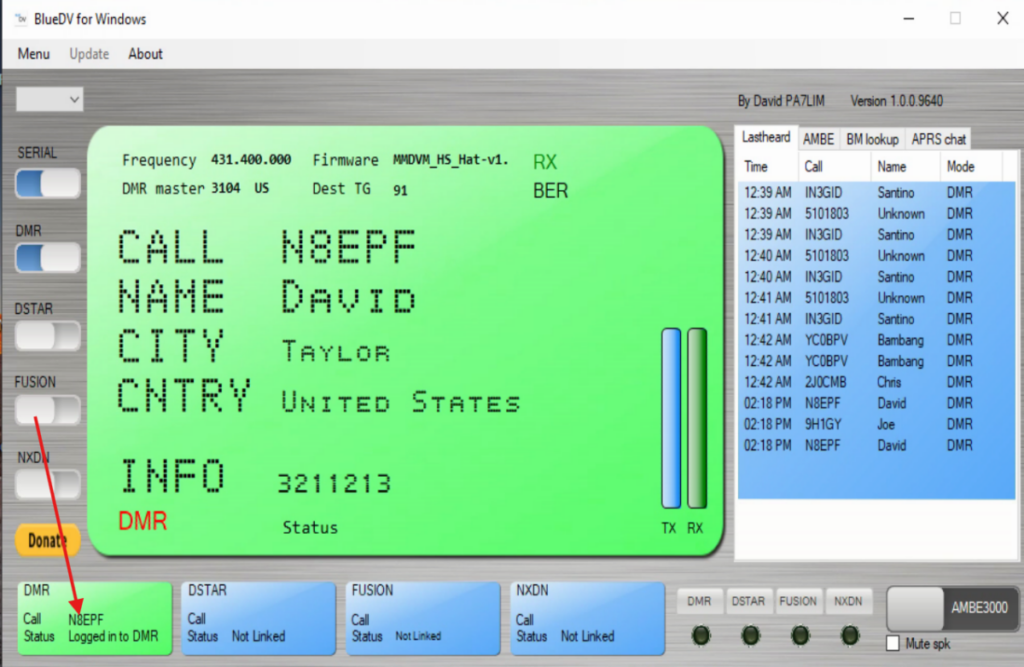
When BlueDV is receiving traffic, the screen will be green with contact details listed. There’s also a running log to the right of most recent contacts. This list clears at restart.
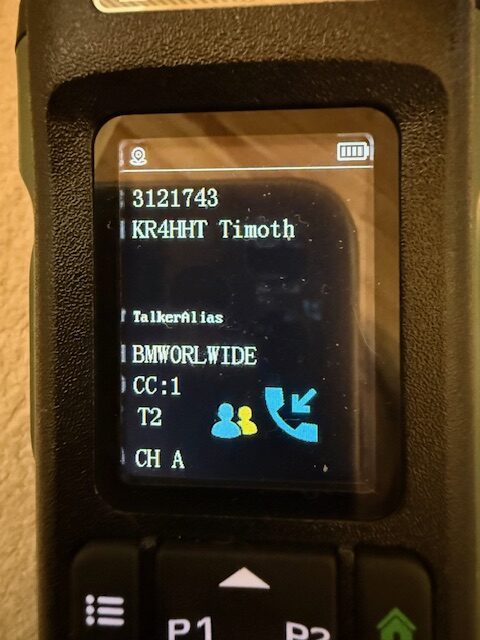
Your radio will show details as well. Your screen will look different dependent on model and firmware. Reference screen is Baofeng DM32.
Hope this was helpful and maybe will catch you somewhere on a TalkGroup.
KC1MUR – Scott
Before o
Author: Scott - KC1MUR
General class operator
No responses yet